
下面是我整理的常用 Git 命令清单。几个专用名词的译名如下。
- Workspace:工作区
- Index / Stage:暂存区
- Repository:仓库区(或本地仓库)
- Remote:远程仓库
本地分支关联远程:git branch –set-upstream-to=origin/beta beta
一、新建代码库
# 在当前目录新建一个Git代码库
$ git init
# 新建一个目录,将其初始化为Git代码库
$ git init [project-name]
# 下载一个项目和它的整个代码历史
$ git clone [url]
二、配置
Git的设置文件为.gitconfig,它可以在用户主目录下(全局配置),也可以在项目目录下(项目配置)。
# 显示当前的Git配置
$ git config –list
# 编辑Git配置文件
$ git config -e [–global]
# 设置提交代码时的用户信息
$ git config [–global] user.name “[name]”
$ git config [--global] user.email "[email address]"
三、增加/删除文件
# 添加指定文件到暂存区
$ git add [file1] [file2] …
# 添加指定目录到暂存区,包括子目录
$ git add [dir]
# 添加当前目录的所有文件到暂存区
$ git add .
\# 添加每个变化前,都会要求确认\# 对于同一个文件的多处变化,可以实现分次提交$ git add -p\# 删除工作区文件,并且将这次删除放入暂存区$ git rm [file1] [file2] ...\# 停止追踪指定文件,但该文件会保留在工作区$ git rm --cached [file]\# 改名文件,并且将这个改名放入暂存区$ git mv [file-original] [file-renamed]
四、代码提交
# 提交暂存区到仓库区
$ git commit -m [message]
# 提交暂存区的指定文件到仓库区
$ git commit [file1] [file2] … -m [message]
# 提交工作区自上次commit之后的变化,直接到仓库区
$ git commit -a
\# 提交时显示所有diff信息$ git commit -v\# 使用一次新的commit,替代上一次提交\# 如果代码没有任何新变化,则用来改写上一次commit的提交信息$ git commit --amend -m [message]\# 重做上一次commit,并包括指定文件的新变化$ git commit --amend [file1] [file2] ...
五、分支
# 列出所有本地分支
$ git branch
# 列出所有远程分支
$ git branch -r
# 列出所有本地分支和远程分支
$ git branch -a
\# 新建一个分支,但依然停留在当前分支$ git branch [branch-name]\# 新建一个分支,并切换到该分支$ git checkout -b [branch]\# 新建一个分支,指向指定commit$ git branch [branch] [commit]\# 新建一个分支,与指定的远程分支建立追踪关系$ git branch --track [branch] [remote-branch]\# 切换到指定分支,并更新工作区$ git checkout [branch-name]\# 切换到上一个分支$ git checkout -\# 建立追踪关系,在现有分支与指定的远程分支之间$ git branch --set-upstream [branch] [remote-branch]\# 合并指定分支到当前分支$ git merge [branch]\# 选择一个commit,合并进当前分支$ git cherry-pick [commit]\# 删除分支$ git branch -d [branch-name]\# 删除远程分支$ git push origin --delete [branch-name]$ git branch -dr [remote/branch]
六、标签
# 列出所有tag
$ git tag
# 新建一个tag在当前commit
$ git tag [tag]
# 新建一个tag在指定commit
$ git tag [tag] [commit]
\# 删除本地tag$ git tag -d [tag]\# 删除远程tag$ git push origin :refs/tags/[tagName]\# 查看tag信息$ git show [tag]\# 提交指定tag$ git push [remote] [tag]\# 提交所有tag$ git push [remote] --tags\# 新建一个分支,指向某个tag$ git checkout -b [branch] [tag]
七、查看信息
# 显示有变更的文件
$ git status
# 显示当前分支的版本历史
$ git log
# 显示commit历史,以及每次commit发生变更的文件
$ git log –stat
\# 搜索提交历史,根据关键词$ git log -S [keyword]\# 显示某个commit之后的所有变动,每个commit占据一行$ git log [tag] HEAD --pretty=format:%s\# 显示某个commit之后的所有变动,其"提交说明"必须符合搜索条件$ git log [tag] HEAD --grep feature\# 显示某个文件的版本历史,包括文件改名$ git log --follow [file]$ git whatchanged [file]\# 显示指定文件相关的每一次diff$ git log -p [file]\# 显示过去5次提交$ git log -5 --pretty --oneline\# 显示所有提交过的用户,按提交次数排序$ git shortlog -sn\# 显示指定文件是什么人在什么时间修改过$ git blame [file]\# 显示暂存区和工作区的差异$ git diff\# 显示暂存区和上一个commit的差异$ git diff --cached [file]\# 显示工作区与当前分支最新commit之间的差异$ git diff HEAD\# 显示两次提交之间的差异$ git diff [first-branch]...[second-branch]\# 显示今天你写了多少行代码$ git diff --shortstat "@{0 day ago}"\# 显示某次提交的元数据和内容变化$ git show [commit]\# 显示某次提交发生变化的文件$ git show --name-only [commit]\# 显示某次提交时,某个文件的内容$ git show [commit]:[filename]\# 显示当前分支的最近几次提交$ git reflog
八、远程同步
# 下载远程仓库的所有变动
$ git fetch [remote]
# 显示所有远程仓库
$ git remote -v
# 显示某个远程仓库的信息
$ git remote show [remote]
\# 增加一个新的远程仓库,并命名$ git remote add [shortname] [url]\# 取回远程仓库的变化,并与本地分支合并$ git pull [remote] [branch]\# 上传本地指定分支到远程仓库$ git push [remote] [branch]\# 强行推送当前分支到远程仓库,即使有冲突$ git push [remote] --force\# 推送所有分支到远程仓库$ git push [remote] --all
九、撤销
# 恢复暂存区的指定文件到工作区
$ git checkout [file]
# 恢复某个commit的指定文件到暂存区和工作区
$ git checkout [commit] [file]
# 恢复暂存区的所有文件到工作区
$ git checkout .
\# 重置暂存区的指定文件,与上一次commit保持一致,但工作区不变$ git reset [file]\# 重置暂存区与工作区,与上一次commit保持一致$ git reset --hard\# 重置当前分支的指针为指定commit,同时重置暂存区,但工作区不变$ git reset [commit]\# 重置当前分支的HEAD为指定commit,同时重置暂存区和工作区,与指定commit一致$ git reset --hard [commit]\# 重置当前HEAD为指定commit,但保持暂存区和工作区不变$ git reset --keep [commit]\# 新建一个commit,用来撤销指定commit\# 后者的所有变化都将被前者抵消,并且应用到当前分支$ git revert [commit]\# 暂时将未提交的变化移除,稍后再移入$ git stash$ git stash pop
十、其他
# 生成一个可供发布的压缩包
$ git archive
Git分支管理策略
一、主分支Master
首先,代码库应该有一个、且仅有一个主分支。所有提供给用户使用的正式版本,都在这个主分支上发布。
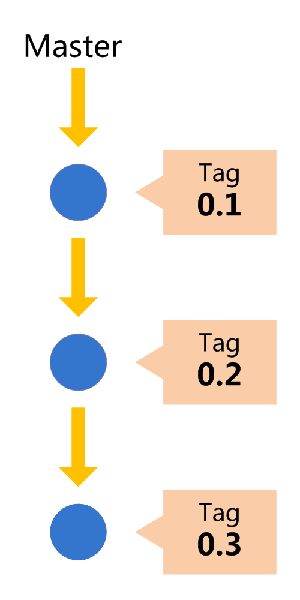
Git主分支的名字,默认叫做Master。它是自动建立的,版本库初始化以后,默认就是在主分支在进行开发。
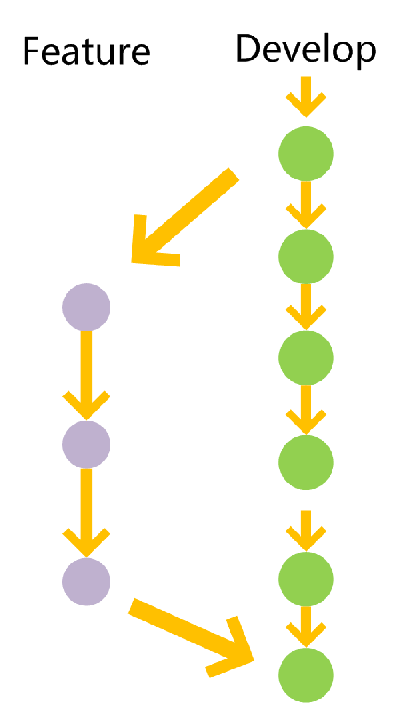
二、开发分支Develop
主分支只用来分布重大版本,日常开发应该在另一条分支上完成。我们把开发用的分支,叫做Develop。
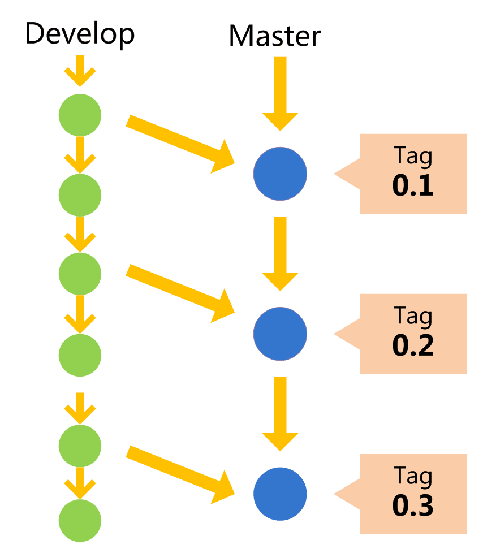
这个分支可以用来生成代码的最新隔夜版本(nightly)。如果想正式对外发布,就在Master分支上,对Develop分支进行”合并”(merge)。
Git创建Develop分支的命令:
git checkout -b develop master
将Develop分支发布到Master分支的命令:
# 切换到Master分支
git checkout master# 对Develop分支进行合并
git merge –no-ff develop
这里稍微解释一下,上一条命令的–no-ff参数是什么意思。默认情况下,Git执行”快进式合并”(fast-farward merge),会直接将Master分支指向Develop分支。
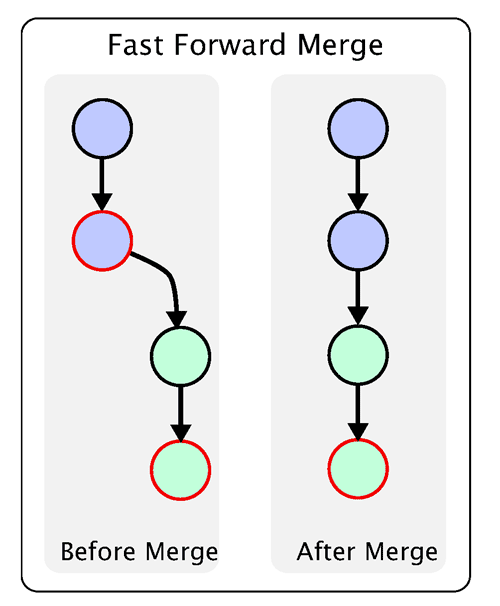
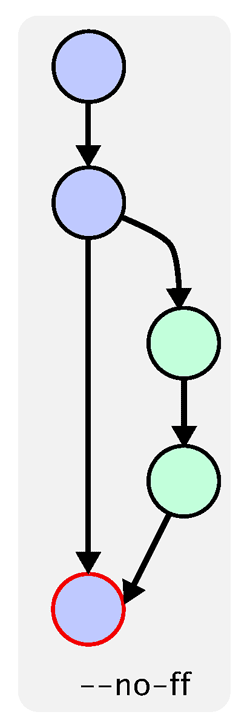
使用–no-ff参数后,会执行正常合并,在Master分支上生成一个新节点。为了保证版本演进的清晰,我们希望采用这种做法。关于合并的更多解释,请参考Benjamin Sandofsky的《Understanding the Git Workflow》。
三、临时性分支
前面讲到版本库的两条主要分支:Master和Develop。前者用于正式发布,后者用于日常开发。其实,常设分支只需要这两条就够了,不需要其他了。
但是,除了常设分支以外,还有一些临时性分支,用于应对一些特定目的的版本开发。临时性分支主要有三种:
* 功能(feature)分支
* 预发布(release)分支
* 修补bug(fixbug)分支
这三种分支都属于临时性需要,使用完以后,应该删除,使得代码库的常设分支始终只有Master和Develop。
四、 功能分支
接下来,一个个来看这三种”临时性分支”。
第一种是功能分支,它是为了开发某种特定功能,从Develop分支上面分出来的。开发完成后,要再并入Develop。
功能分支的名字,可以采用feature-*的形式命名。
创建一个功能分支:
git checkout -b feature-x develop
开发完成后,将功能分支合并到develop分支:
git checkout develop
git merge –no-ff feature-x
删除feature分支:
git branch -d feature-x
五、预发布分支
第二种是预发布分支,它是指发布正式版本之前(即合并到Master分支之前),我们可能需要有一个预发布的版本进行测试。
预发布分支是从Develop分支上面分出来的,预发布结束以后,必须合并进Develop和Master分支。它的命名,可以采用release-*的形式。
创建一个预发布分支:
git checkout -b release-1.2 develop
确认没有问题后,合并到master分支:
git checkout master
git merge –no-ff release-1.2
# 对合并生成的新节点,做一个标签
git tag -a 1.2
再合并到develop分支:
git checkout develop
git merge –no-ff release-1.2
最后,删除预发布分支:
git branch -d release-1.2
六、修补bug分支
最后一种是修补bug分支。软件正式发布以后,难免会出现bug。这时就需要创建一个分支,进行bug修补。
修补bug分支是从Master分支上面分出来的。修补结束以后,再合并进Master和Develop分支。它的命名,可以采用fixbug-*的形式。
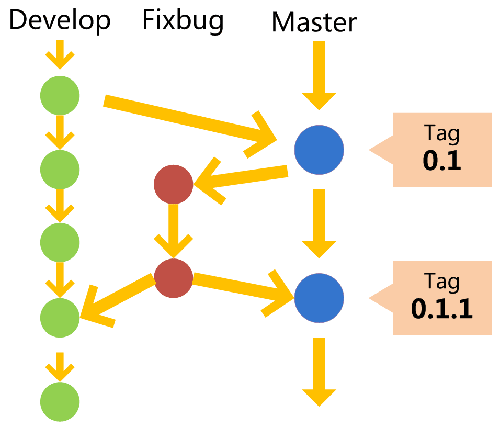
创建一个修补bug分支:
git checkout -b fixbug-0.1 master
修补结束后,合并到master分支:
git checkout master
git merge –no-ff fixbug-0.1
git tag -a 0.1.1
再合并到develop分支:
git checkout develop
git merge –no-ff fixbug-0.1
最后,删除”修补bug分支”:
git branch -d fixbug-0.1
版本回退-撤销文件修改
{针对文件修改恢复}
工作区修改一个文件后,又想回到修改前(git add前)
\1. 当然可以直接手动再在工作区中将文件修改回去
\2. 修改后,通过命令git status查看
$ git status
# On branch master
# Changes not staged for commit:
# (use “git add
# (use “git checkout –
#
# modified: readme.txt
#
no changes added to commit (use “git add” and/or “git commit -a”)
这时Git会告诉你,git checkout – file可以丢弃工作区的修改:
1 | $ git checkout -- readme.txt |
Note:
\1. git checkout – file命令中的–很重要,没有–,就变成了“切换到另一个分支”的命令,我们在后面的分支管理中会再次遇到git checkout命令。
\2. 命令git checkout – readme.txt意思就是,把readme.txt文件在工作区的修改全部撤销,这里有两种情况:
一种是readme.txt自修改后还没有被放到暂存区,现在,撤销修改就回到和版本库一模一样的状态;一种是readme.txt已经添加到暂存区后,又作了修改,现在,撤销修改就回到添加到暂存区后的状态。总之,就是让这个文件回到最近一次git commit或git add时的状态。
\3. 工作区、暂存区的概念不清楚的可见于Git版本控制教程 - Git本地仓库
如果在工作区中修改了文件还git add到暂存区(但是在commit之前)
用git status查看一下,修改只是添加到了暂存区,还没有提交:
$ git status
# On branch master
# Changes to be committed:
# (use “git reset HEAD
#
# modified: readme.txt
#
Git同样告诉我们,用命令git reset HEAD file可以把暂存区的修改撤销掉(unstage),重新放回工作区:
$ git reset HEAD readme.txt
Unstaged changes after reset:
M readme.txt
git reset命令既可以回退版本,也可以把暂存区的修改回退到工作区。当我们用HEAD时,表示最新的版本。
再用git status查看一下,现在暂存区是干净的,工作区有修改。
然后丢弃工作区的修改
$ git checkout – readme.txt
$ git status
# On branch master
nothing to commit (working directory clean)
不但修改了文件还从暂存区提交commit到了版本库 - 版本回退
版本回退可以回退到上一个版本。不过,这是有条件的,就是你还没有把自己的本地版本库推送到远程。Git是分布式版本控制系统。
在工作中对某个文件(如readme.txt)进行多次修改交commit。
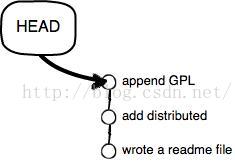
可以通过版本控制系统命令告诉我们提交的历史记录,在Git中,我们用git log命令查看:
$ git log
commit 3628164fb26d48395383f8f31179f24e0882e1e0
Author: Michael Liao askxuefeng@gmail.com
Date: Tue Aug 20 15:11:49 2013 +0800
append GPL
commit ea34578d5496d7dd233c827ed32a8cd576c5ee85
Author: Michael Liao askxuefeng@gmail.com
Date: Tue Aug 20 14:53:12 2013 +0800add distributedcommit cb926e7ea50ad11b8f9e909c05226233bf755030Author: Michael Liao <askxuefeng@gmail.com>Date: Mon Aug 19 17:51:55 2013 +0800wrote a readme fileNote:
\1. git log命令显示从最近到最远的提交日志,我们可以看到3次提交,最近的一次是append GPL,上一次是add distributed,最早的一次是wrote a readme file。
\2. 如果嫌输出信息太多,看得眼花缭乱的,可以试试加上–pretty=oneline参数:
$ git log –pretty=oneline
3628164fb26d48395383f8f31179f24e0882e1e0 append GPL
ea34578d5496d7dd233c827ed32a8cd576c5ee85 add distributed
cb926e7ea50ad11b8f9e909c05226233bf755030 wrote a readme file
\3. 你看到的一大串类似3628164…882e1e0的是commit id(版本号),和SVN不一样,Git的commit id不是1,2,3……递增的数字,而是一个SHA1计算出来的一个非常大的数字,用十六进制表示,而且你看到的commit id和我的肯定不一样,以你自己的为准。为什么commit id需要用这么一大串数字表示呢?因为Git是分布式的版本控制系统,后面我们还要研究多人在同一个版本库里工作,如果大家都用1,2,3……作为版本号,那肯定就冲突了。
\4. 每提交一个新版本,实际上Git就会把它们自动串成一条时间线。如果使用可视化工具(如GitX、github的客户端、pycharm)查看Git历史,就可以更清楚地看到提交历史的时间线。0
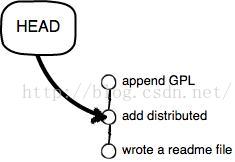
现在我们想要把readme.txt回退到上一个版本
如“add distributed”的那个版本,怎么做呢?首先,Git必须知道当前版本是哪个版本,在Git中,用HEAD表示当前版本,也就是最新的提交3628164…882e1e0(注意我的提交ID和你的肯定不一样),上一个版本就是HEAD^,上上一个版本就是HEAD^^,当然往上100个版本写100个^比较容易数不过来,所以写成HEAD~100。
现在,我们要把当前版本“append GPL”回退到上一个版本“add distributed”,就可以使用git reset命令:
$ git reset –hard HEAD^
HEAD is now at ea34578 add distributed
这时readme.txt的内容就成了版本add distributed
我们用git log再看看现在版本库的状态:
$ git log
commit ea34578d5496d7dd233c827ed32a8cd576c5ee85
Author: Michael Liao askxuefeng@gmail.com
Date: Tue Aug 20 14:53:12 2013 +0800
add distributed
commit cb926e7ea50ad11b8f9e909c05226233bf755030
Author: Michael Liao askxuefeng@gmail.com
Date: Mon Aug 19 17:51:55 2013 +0800wrote a readme file最新的那个版本append GPL已经看不到了!
恢复文件后,要是我们又想回到修改后的文件呢?(命令行窗口还没有被关掉)
{这个是git reset –hard后,又反悔了,想回到修改后的状态}
只要上面的命令行窗口还没有被关掉,你就可以顺着往上找啊找啊,找到那个append GPL的commit id是3628164…,于是就可以指定回到未来的某个版本:
$ git reset –hard 3628164
HEAD is now at 3628164 append GPL
版本号没必要写全,前几位就可以了,Git会自动去找。
Git的版本回退速度非常快,因为Git在内部有个指向当前版本的HEAD指针,当你回退版本的时候,Git仅仅是把HEAD从指向append GPL:
改为指向add distributed:
然后顺便把工作区的文件更新了。所以你让HEAD指向哪个版本号,你就把当前版本定位在哪。
恢复文件后,要是我们又想回到修改后的文件呢?(命令行窗口早就关掉了)
{这个是git reset –hard后,又反悔了,想回到修改后的状态}
想恢复到新版本怎么办?找不到新版本的commit id怎么办?当你用$ git reset –hard HEAD^回退到add distributed版本时,再想恢复到append GPL,就必须找到append GPL的commit id。
Git提供了一个命令git reflog用来记录你的每一次命令:[Git高级教程:git log与git reflog]
$ git reflog
ea34578 HEAD@{0}: reset: moving to HEAD^
3628164 HEAD@{1}: commit: append GPL
ea34578 HEAD@{2}: commit: add distributed
cb926e7 HEAD@{3}: commit (initial): wrote a readme file
第二行显示append GPL的commit id是3628164,现在,你又可以乘坐时光机回到未来了。
]]>


 1$BuM.Ox4e$X/RX2ftRaBzzVzoL6TkI0/:17943:0:99999:7::: —————-root后面的两个root::17943之间一串乱码就是加密后的密码(需要在“管理权”设置好SCP上去打开复制下来,不能直接填入明文),此处示例为admin。
